 |
R-Plot Version 2.0 |
 © 2012 – 2020, Dr. J. Rathlev, 24222 Schwentinental, Germany
|
Desktop
Click on a region of the following screenshot will lead to specific help for that region.
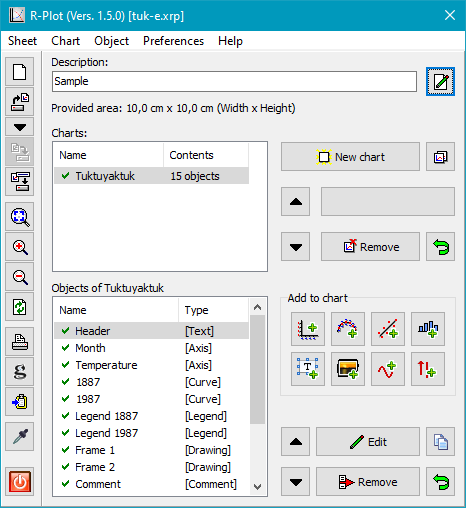
Main menu
- Sheet
- New - Create a new sheet
- Load .. - Load a saved sheet (F3)
- Recently used .. - List of of recently used sheets
- Save - Save a modified sheet (F2)
- Save as .. - Save a sheet as new file
- Properties .. - Edit properties of sheet
- Print .. - Print sheet
- Export
- as Postscript - Export sheet as EPS
- to clipboard - Copy sheet clipboard
- Quit - Quit program
- Chart
- New .. - Add a new chart (Ctrl+D)
- Edit .. - Edit properties (e.g. size and background color)
of chart
- Remove .. - Remove chart
- Objects
- Add
- Axis
- X axis - Add a horizontal axis(Ctrl+X)
- Y axis - Add a vertical axis(Ctrl+Y)
- Curve .. - Add a data curve (Ctrl+C)
- Best-fit curve .. - Add a best-fit curve (Ctrl+F)
- Graph
- Bar graph .. - Add a bar graph (Ctrl+B)
- Histogram .. - Add a histogram (Ctrl+H)
- Function .. - Add a function (Ctrl+U)
- Text
- Box .. - Add multi-line text box (Ctrl+T)
- Comment .. - Add rotatable single-line text (Ctrl+M)
- Legend .. - Add legend for curve (Ctrl+G)
- Result .. - Add box with best-fit results (Ctrl+R)
- Image.. - Add an image (e.g. bmp, jpg, png) (Ctrl+I)
- Other
- Line .. - Add line with optional arrows (Ctrl+L)
- Rectangle .. - Add rectangle with optional fill (Ctrl+O)
- Edit .. - Edit the selected object (Ctrl+E)
- Remove .. - Remove selected object
- Preferences
- Sheet - Edit preferences for new sheets
- Language - Select desktop language
- System default - Use the system default language.
- English
- German
- Help
- Documentation - Show this help file (F1)
- About - Information about the program
- References .. - Information on components used from other authors
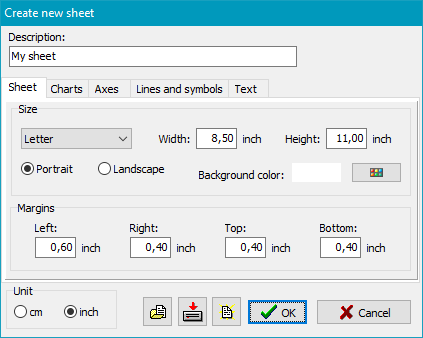
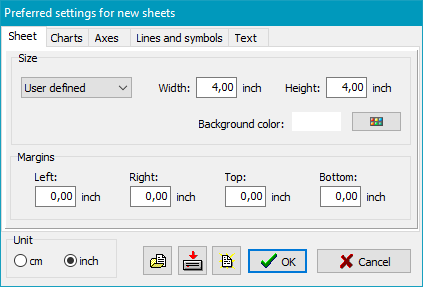
 Create new sheet
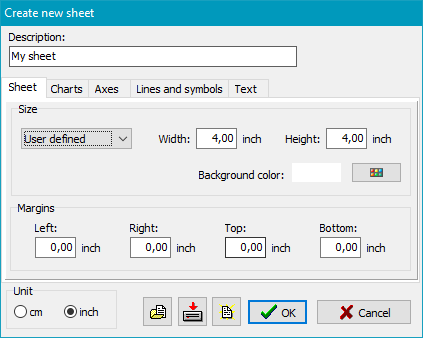
Clicking the button or using the menu item Sheet ⇒ New ..
will open the dialog shown at right to enter a short description and select the sheet size, the
margin widths (only required for direct sheet printing), the units to be used
(cm or inch) and the preferences for the charts to be created afterwards.
By default, the sheet size is set to 4 x 4 inch2 suitable
to be inserted as a picture in a document.
The user can adjust this setting to his wishes anytime by calling the menu item
Preferences⇒ Sheet.
Next to this, the program will create the first chart
automatically fitting to the size of the sheet.
 Edit sheet
Clicking the button or using the menu item Sheet ⇒ Edit ..
will open the dialog shown at right to edit the sheet properties described above. Use the buttons
in the middle of the bottom section to load preferences from a file, save the
current settings to a file or to reset all values to their default. Doing so,
you can customize your basic design for different projects.
 Load sheet
Clicking the button or using the menu item Sheet ⇒ Load ..
will open a dialog to select a saved sheet (file type: xrp). The sheet
will be loaded and displayed immediately.
All recently used sheets are stored in a program internal list for fast selection:
Click the button  or use the menu item Sheet ⇒ Recently used ...
Note: All sheets are saved as zip archives containing an XML file
with the sheet data and the used images (if present) in BMP format.
 Saving an edited sheet
Clicking the button or using the menu item Sheet ⇒ Save ..
will save the sheet data immediately using the current filename.
 Saving a sheet with a new filename
Clicking the button or using the menu item Sheet ⇒ Save as ..
will save the sheet data under a new filename.
Graphical display
 Adjust size
The graphic display will be scaled in a way that the sheet fits to the window.
 Zoom in
The graphic display will be scaled up in steps of 1.4. The displayed details
can be moved by mouse dragging or using the scroll bars.
 Zoom out
The graphic display will be scaled down in steps of 1.4.
 Update display
Clicking this button will redraw the graphic window.
Printing and export
 Print the sheet
Clicking the button or using the menu item Sheet ⇒ Print ..
will will open a dialog to select a printer and then start the print-out
of the sheet.
 Export sheet as Encapsulated-Postscript file (EPS)
The sheet will be converted to Postscript and saved as file which can later on
be inserted for example as picture into a LaTeX document.
 Copy sheet to Windows clipboard
The sheet will be copied to the Windows clipboard and can be inserted from there
into any other appropriate application (such as text processing).
 Pick up a color
Clicking the button will modify the cursor to an eyedropper if moved over the
sheet. The color under the cursor will be displayed at the lower right with its
RGB values. Clicking the mouse will save this color as user defined color
and can be later on selected in each color dialog (e.g. for lines or background).
 Add new chart
Clicking the button or using the menu item Chart ⇒ New ..
will open a dialog to edit the chart settings. The chart size will be calculated
automatically in a way that the first chart will fill the whole sheet. Adding more
charts, they will be arranged vertically with appropriate heights. In doing so,
an adjustable space for axes will be preserved. Nevertheless the user can change
location and size of charts for his purposes.
Optional you can select a background color and a frame.
Each chart will be labeled automatically with a unique name but you can change this
name if you want. The upper list on the desktop will show you all charts in the
sheet with their names and the associated number of objects.
A green check mark means that the chart is currently displayed, a red struck circle
that the chart is not visible (refer to the check box at the lower left in
the chart edit dialog). If a red cross is displayed instead, this chart was marked for
removing.
When updating the graphic window, the charts will be drawn in the order shown in the list. That
means that a chart placed further down will overlap charts placed above. To change
this order click one of the arrow buttons. The position of the selected chart
will be moved accordingly.
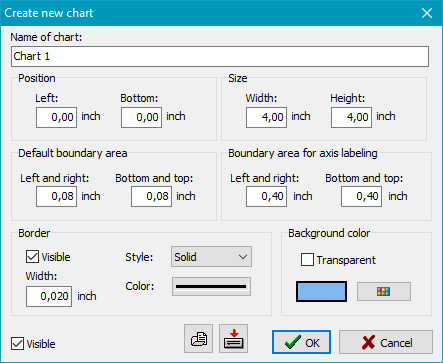
 Edit chart
Clicking the button or using the menu item Chart ⇒ Edit ..
will open the dialog to edit the chart settings:
- Name: Name of the chart (automatically or user defined)
- Position: Specify the position of the lower left corner of the chart
(this will likewise be the origin of each first axis of coordinates).
- Size: Specify width and height of the chart (this will likewise be the
length of each first axis of coordinates).
- Default boundary area: This is the width of the space kept free
at those sides of the chart showing no axes (default: 0.08 inch).
- Boundary area for axis labeling: This is the width of the space kept free
at those sides of the chart showing the axes (default: 0.4 inch). If there are more
than one axis at one side of the chart this space is multiplied accordingly.
- Border: By default, the axes will border the chart. Alternatively,
you can draw a line with adjustable width, style and color instead.
- Background color: A chart can be transparent or provided with a
background of selected color.
All chart settings including the settings for objects can be saved as template
for reuse in other charts:
 Load a chart template
 Save current settings
as template
Save current settings
as template
Remove chart
Clicking the button or using the menu item Chart ⇒ Remove ..
the selected chart will be marked as deleted which is displayed by a red cross
in the list of charts. You can undo this anytime before saving the sheet by
clicking the button provided for this purpose.
Saving a sheet will delete the marked charts definitely.
Duplicate a chart
Clicking the button will create a clone of the selected chart including all
its objects. Position and size of the other charts will be adjusted automatically.
You can add different objects to each chart. Just click one of the buttons in the
tool palette. Some buttons will open a submenu for a specific selection.
Each object will be labeled automatically by the program with a unique name, but
you can change this if you wants.
The lower list on the desktop will show you all objects of the selected chart
with their names and type information.
A green check mark means that the object is currently displayed, a red struck circle
that the object is not visible (refer to the check box at the lower left in the edit
dialogs of the provided objects). If a red cross is displayed instead, this object
was marked for removing.
When updating the graphic window, the objects will be drawn in the order shown in the list.
That means that an object placed further down will overlap objects placed above. To
change this order click one of the arrow buttons. The position of the selected
object will be moved accordingly.
Some object dialogs offer the option to save the settings (e.g. for an axis) as
template. You can load such a template to reuse the settings for other objects
Load a template
Save current settings
as template
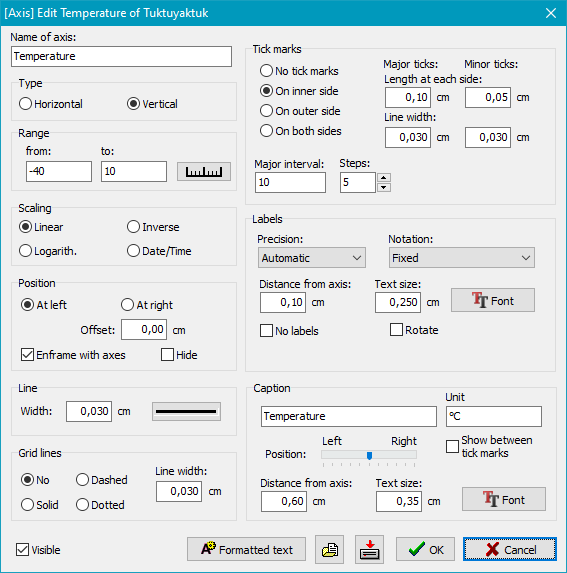
 Add coordinate axis
The selection menu offers to create an X or Y axis or to duplicate an existing
axis. The dialog window (see picture at the right) shows the properties of the
new axis for editing by the user:
- Name: Name of axis (automatic or user defined)
- Type: Type of axis (either horizontal or vertical)
- Range: Range for axis scaling (start and end value)
Clicking the button showing a scale symbol will compute the
distances of major and minor tick marks automatically.
- Scaling: The scaling can be either linear, logarithmic, inverse
or linear containing a time scale with date and time values.
- Position: The axis will be positioned relative to the left or right
margin (resp. lower or upper margin). When creating a new axis the offset will be
computed automatically depending on the number of axes already existing
in the chart.
Optional you can create a mirror of the axis at the relative opposite side
of the chart or use an invisible axis.
- Line: Adjust the line width and color.
- Grid lines: You can display lines across the chart at the major tick
marks. Width and color are selectable.
- Tick marks: Adjust the width and length of the tick marks. In addition
you can select if the marks should be drawn at the inner or outer side of
the axis or on both sides.
The distance between the tick marks can be computed automatically (see above
under Range) or adjusted manually:
- Major interval: Specify in units as in the range setting
- Steps: Number of sub-intervals
- Axis labeling with numbers:
- Precision: This specifies the number of relevant digits to be displayed
(1 .. 8, automatic or integer value). The program will round all values
accordingly. If integer values are selected, the numbers can be replaced by
a user defined labels (see below).
- Notation: You can select how the number should be displayed:
fixed (12345.6), scientific (1.23456⋅104),
engineering (12.3456⋅103) or using unit prefixes (12.3456k)
- Distance to axis: This is the distance between the axis and the side
of the labels facing the axis.
- Text size and font: Select label size and font.
- Other options: Optional labeling can be suppressed and rotated
by 90° for vertical axes.
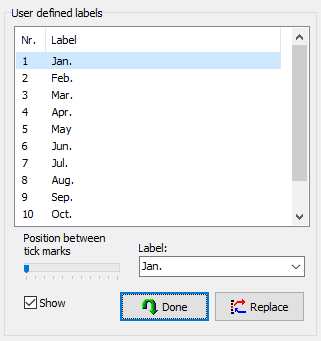
- Axis labeling with user defined labels: If integer values
was selected as precision, clicking the user defined labels button
will open a field to enter the labels for each major tick mark
(e.g. the names of the months as shown in picture at the right).
The position of the label can be shifted by the slider inside the major interval
between a center position at the associated tick mark and a center position
of the following tick mark. If the slider is set to its central position,
the label will displayed in the middle of the interval. Check the
box at the lower left to enable the user defined labels. Otherwise
the numbers would be displayed. At last click the Done button to
apply the settings.
- Caption:
- Text and unit: Insert the caption at the axis. The optional
unit will will be either added with a preceding slash to the caption or
if the option Show between tick marks is selected, displayed between
the last two tick marks of the axis (DIM 461).
- Position: Use the slider to move the caption along the axis.
In addition the distance to the axis can be changed if desired.
- Text size and font: The size and the font of the caption can
be adjusted individually.
- Individual text formatting: Particular parts of the labels and captions
can be formatted as bold, italic, superscript or subscript
and you can insert special characters (such as Greek letters)
(more details).
 Add data curve
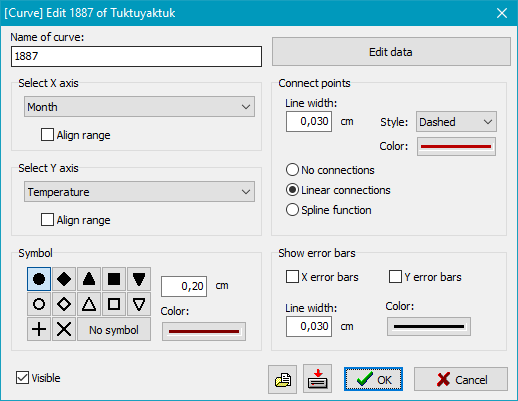
If this button is clicked on an empty sheet, a new sheet filling chart including
two axes for X and Y will be created automatically. The ranges will be adjusted
after the entry of the data points.
The dialog window (see the picture at the right) shows the properties of the
curve for editing by the user:
- Name: Name of the curve (automatic or user defined)
- Select X axis: If more than one X axes are defined, select the
one associated to the data for correct scaling.
Optionally, an automatic adjustment of the axis range according to the data can
be selected.
- Select Y axis: If more than one Y axes are defined, select the
one associated to the data for correct scaling.
Optionally, an automatic adjustment of the axis range according to the data can
be selected.
- Edit data: Clicking this button will open the dialog to
enter the data points.
- Symbol: Each data point will be marked using a selectable symbol.
Shape, size and color can be adjusted.
- Connect points: If desired, the data point can be connected by straight
lines or using a spline function as smooth curve. The smoothing factor is
adjustable (0 = no smoothing, 100 = strong smoothing). Also line with, style
(only for straight lines) and color are selectable.
- Show error bars: If the data set contains error deviations for
each point, they can be displayed as error bars in the chart (separated for X and Y).
Line width and color are selectable.
Data input
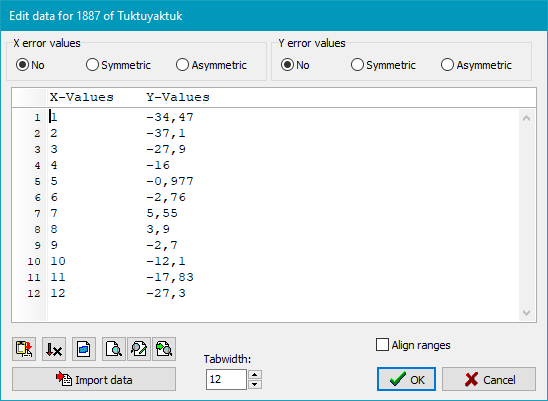
The data input uses a text editor and is done line by line (see picture at the right).
You can use either the tab or the space key to separate the columns.
In the upper part of the window, you can select if the data set contains
error values. According to this, additional columns will be provided (see the
picture at the lower right). Error values are always given as differences to
the nominal value and can be asymmetrical (values must be positive in any case).
In the lower part of the window, you will find a tool bar with buttons
for the following functions:
 Paste text from clipboard
 Sort table
by increasing X values
Sort table
by increasing X values
 Switch
between block and column mode on marking text
Switch
between block and column mode on marking text
 Search for text
 Replace text
 Find or
replace next text
Find or
replace next text
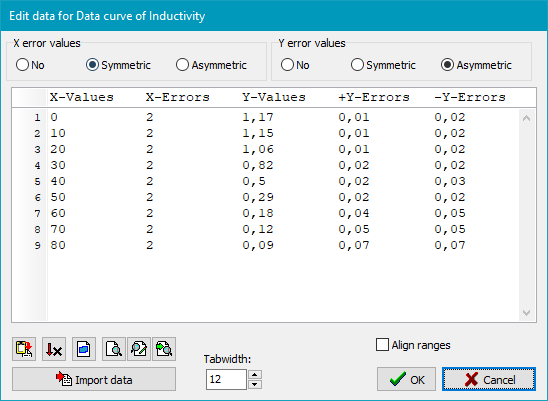
- Import data: To import data in CSV format see below
- Align ranges: If this box is checked, the check boxes in the
curve dialog for automatic scaling will be selected after closing the data
input window.
Date and time input
Both manual input and import can use the following formats:
- yyyy-mm-dd only date, e.g. 2020-07-21
- [d]d.[m]m.yyyy only date, e.g. 21.7.2020
- hh:mm[:ss] only time. e.g. 12:30:15 or 12:30
- sss[,z] time in seconds, e.g. 125,5
- yyyy-mm-dd hh:mm:ss date and time, e.g. 2020-07-21 12:30:15
- [d]d.[m]m.yyyy hh:mm[:ss] date and time, e.g. 21.7.2020 12:30:15
Import data
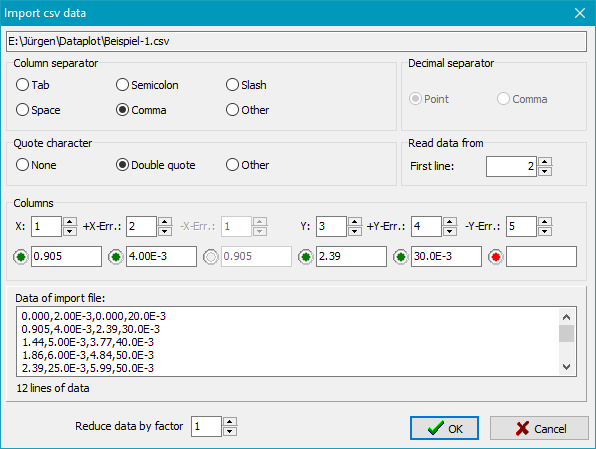
All data saved in CSV format (comma separated values) can be imported.
Because this format is supported by many applications, it provides a versatile data source.
The format settings in detail and the column allocation can be selected (see picture
at the right). Leading comment lines can be skipped.
Depending on the CSV file to be imported, the column separator (e.g. comma or
semicolon), the decimal separator (point or comma) and the field delimiter (e.g.
quotations marks) must be selected as required. In lower window a section of the
CSV file to be imported will be displayed for examination. The columns
must be selected by clicking the small arrows beside of the column counters. A
green dot signals that the value was read faultlessly. If the signal is red,
either the column separator or the column selection is faulty.
Reduce data by factor ..: To reduce the number of a large amount of data
sets, a factor can be specified. For example a number of 5 will take the average of
each five data sets.
 Add best-fit curve
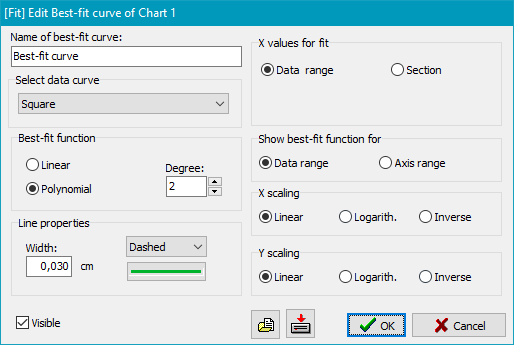
Computing the best-fit curve (linear function or polynomial up to 10th degree)
uses the method of least squares. The scaling in X or Y direction can independently
of each be linear, logarithmic or inverse.
- Name: Name of the best-fit curve (automatic or user defined)
- Select data curve: Select the data set to be used for best-fit computation.
- Best-fit function: You can either select a linear function (linear
regression) or a polynomial up to 10th degree.
- Line properties: Adjust width, style and color.
- X values for fit: To compute the best-fit you can either use the full
X range or only an adjustable section (e.g. if the data curve can be approximated
only for a part of the range by a line).
- Show fit function for ..: You can select if the best-fit should
only be displayed for the given data range or extrapolated to the limits
of the axis.
- X and Y scaling: Prior to the computation,the X or Y values will
scaled as selected. This can be used, for example, to compute the asymptotes
of a double logarithmic chart.
 Add function as curve
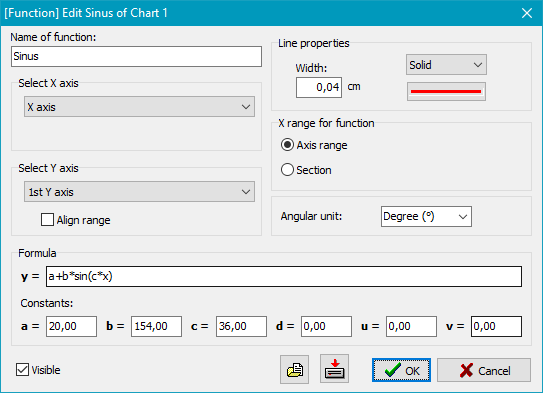
A function described by an arithmetic expression will be added to the chart.
If this button is clicked on an empty sheet, a new sheet filling chart including
two axes for X and Y will be created automatically. The range of the X axis
must be specified before the function can be entered.
The dialog window (see the picture at the right) shows the properties of the
function for editing by the user:
- Name: Name of the function (automatic or user defined)
- Select X axis: If more than one X axes are defined, select the
one associated to the function for correct scaling.
- Select Y axis: If more than one Y axes are defined, select the
one associated to the function for correct scaling.
Optionally, an automatic adjustment of the axis range according to the data can
be selected.
- Line properties: Adjust width, style and color.
- X range for function: you can either use the full X axis range or
only an adjustable section (from ... to)
- Angular units: Ob computing the function, the following angular
units can be used: radiant (rad), degree (°) or
gradian (gon).
- Formula: Enter the functional relation y = f(x)
as formula. The syntax is similar to most programming languages. Expressions
are not case sensitive. The arguments in trigonometric function must
be specified in the selected angular units (see above). The same is valid
for the results of arc functions. You can use up to 6 user defined constants
in the formula. This simplifies to copy complex formulas inside a chart because
only constants must be adjusted.
- Numbers:
- Numbers can contain a leading sign, a decimal separator (as defined by the
system) and an exponent.
Examples: 3 ; 4.7 ; -0.03 ; 1.2E-2
- Variable:
- Value from the selected X axis: x
- Constants:
- Predefined constants: Pi and e
- User defined constants: a, b, c, d, u and v
- Operators:
- You can use the operators for the four basic arithmetic operations +, -,
* and /. Powers must be specified by the ^ sign.
Parentheses, even nested, are allowed. The order of operations will be applied
as common in mathematics .
Example: 2.1 * x^2 + 3.5*(x-0.5) + e^x
- Functions:
-
- Trigonometric functions: sin, cos, tan and cot
- Arc functions: asin, acos, atan und acot
- Hyperbolic functions: sinh, cosh, tanh, and coth
- Area functions: asinh, acosh, atanh and acoth
- Logarithmic functions: ln (natural) and lg (common)
- e function: exp and square root: sqrt
- other: abs (Absolute value), sign (Sign) and fak (factorial)
 Special charts
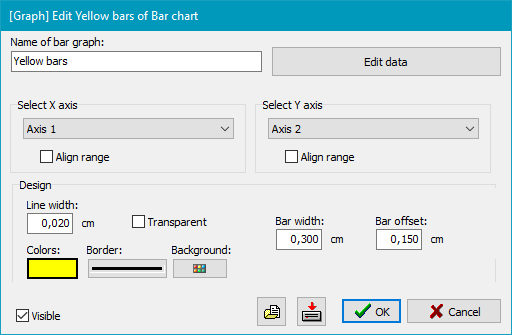
Add bar chart
If this button is clicked on an empty sheet, a new sheet filling chart including
two axes for X and Y will be created automatically. The ranges will be adjusted
after the entry of the data points.
The dialog window (see the picture at the right) shows the properties of the
bar chart for editing by the user:
- Name: Name of the bar chart (automatic or user defined)
- Select X axis: If more than one X axes are defined, select the
one associated to the data for correct scaling.
Optionally, an automatic adjustment of the axis range according to the data can
be selected.
- Select Y axis: If more than one Y axes are defined, select the
one associated to the data for correct scaling.
Optionally, an automatic adjustment of the axis range according to the data can
be selected.
- Edit data: Clicking this button will open the dialog to
enter the data points.
- Design: Adjust width and color of the border and the background color
of the bars.
- Bar width: The bars will be displayed symmetrically to the X value
with the specified width.
- Bar offset: If several data series should be displayed, those
lying in the background can be displayed off to one side from the X value.
Add histogram
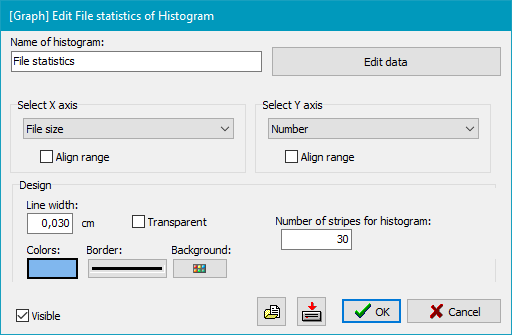
If this button is clicked on an empty sheet, a new sheet filling chart including
two axes for X and Y will be created automatically. The ranges will be adjusted
after the entry of the data points.
On data entry, only one set of X values is required. Prior to displaying the chart,
the program will compute automatically how many values will fit to each a stripe.
The dialog window (see the picture at the right) shows the properties of the
bar chart for editing by the user:
- Name: Name of the histogram (automatic or user defined)
- Select X axis: If more than one X axes are defined, select the
one associated to the data for correct scaling.
Optionally, an automatic adjustment of the axis range according to the data can
be selected.
- Select Y axis: If more than one Y axes are defined, select the
one associated to the data for correct scaling.
Optionally, an automatic adjustment of the axis range according to the data can
be selected.
- Edit data: Clicking this button will open the dialog to
enter the data points.
- Design: Adjust width and color of the border and the background color
of the bars.
- Number of stripes: The X axis will be divided in the number of stripes.
Each stripe represents a range of values. All data values fitting to each range
will be counted and displayed by an dedicated bar height.
 Add text objects
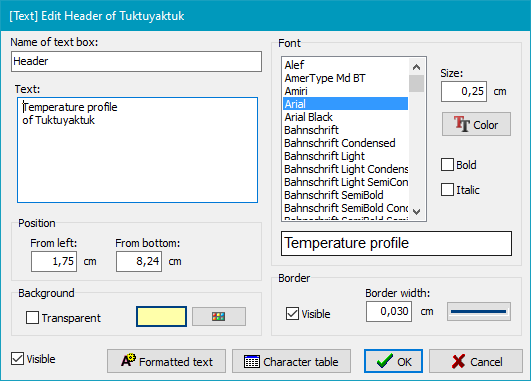
Use this function to add independently placeable text. There are four variants
(text box, comment, legend and
Best-fit result) as described below. All have the following common
properties:
- Name: Name of text object (automatic or user defined)
- Position: Specify the position of the lower left corner of the
text object relative to the lower left corner of the sheet. Each text object
can be dragged interactively in the graphic window using the mouse.
- Font: You can select any text font from the available TrueType
fonts on your computer. By default, Arial is selected. Size and
color are adjustable. In addition, you can select the style (bold and/or italic).
If you want to export your sheet as EPS, it is recommended to use
a font similar to one of the Postscript fonts (Times New Roman, Arial and Courier New).
- Background: The text object can have either a transparent background
or any selected color (except for comments).
- Border: Optionally, a border can be drawn around the text object
(except for comments). Line width and color are adjustable.
- Formatted text: Marks the selected text for a special format (e.g. bold)
(more details).
- Character table: Opens a dialog to select a character not available
on the keyboard (more details).
Text box
The text can contain several lines. The size of border and background are
adjusted automatically.
- Individual text formatting: Particular parts of the text
can be formatted as bold, italic, superscript or subscript
and you can insert special characters (such as Greek letters)
(more details).
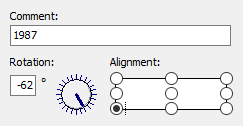
Comments
A comment can only hold one line but can be rotated. The reference point
rotation is selectable.
- Individual text formatting: Particular parts of the text
can be formatted as bold, italic, superscript or subscript
and you can insert special characters (such as Greek letters)
(more details).
- Rotation: Specify the angle of rotation counterclockwise in °
- Alignment: Select the reference point for the specified position
Legends
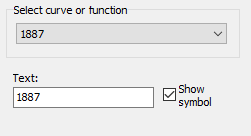
A legend shows a short snippet (symbol + line) of a curve or function together
with a short, user defined description.
- Select curve or function: Select the curve
or function the legend refers to.
- Individual text formatting: Particular parts of the text
can be formatted as bold, italic, superscript or subscript
and you can insert special characters (such as Greek letters)
(more details).
- Show symbol: Display the symbol used for the data points of the curve.
Best-fit result
A text box is displayed showing the result of the computation for the best-fit
(polynomial coefficients).
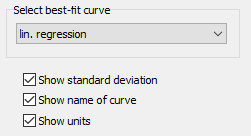
- Select best-fit curve: Select the best-fit curve
whose result should be displayed
- Show standard deviation: Optional display of standard deviation
- Show name of curve: Optional display of the name of the
best-fit curve as box header.
- Show units: If there are units specified for the exes,
the coefficients will be labeled accordingly.
 Add graphic objects
Use this function to add lines (optionally with arrow heads) and rectangles (transparent
or colored) to your chart. Each object can be dragged and scaled interactively
in the graphic window using the mouse.
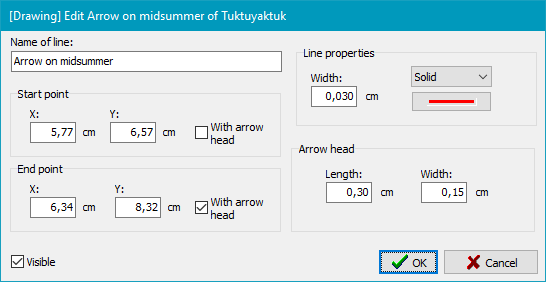
Lines
- Name: Name of the object (automatic or user defined)
- Start point:
- X and Y: Specify the position of the start point of the
line relative to the lower left corner of the sheet.
- With arrow head: Draw an arrow head at the start point
- End point:
- X and Y: Specify the position of the end point of the
line relative to the lower left corner of the sheet.
- With arrow head: Draw an arrow head at the end point
- Line properties: Adjust width, style and color.
- Arrow head: Adjust width and length of the arrow head.
Rectangle

- Name: Name of the object (automatic or user defined)
- Position and size: Specify the position of the left lower corner
relative to the lower left corner of the sheet and the width and height of
the rectangle.
- Border: Adjust width, style and color of the border.
Optionally the border can be suppressed.
- Background: The rectangle can have either a transparent background
or any selected color.
 Add image
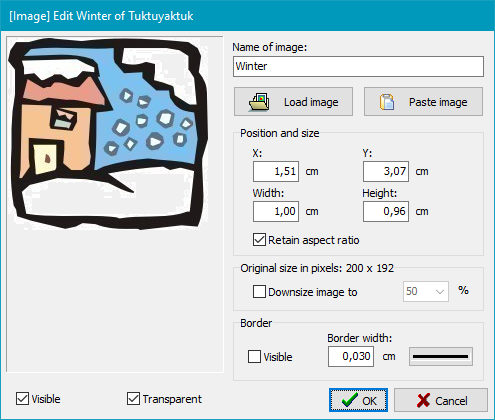
Use this function to insert any image (jpg, bmp, gif, png, tif or emf)
into the chart. The image can be dragged interactively in the graphic window
using the mouse.
- Name:Name of the image (automatic or user defined)
- Load image: A dialog will open to select the image file.
- Paste image: The image will be pasted from the clipboard.
- Position and size:
- X and Y: Specify the position of the left lower corner
relative to the lower left corner of the sheet of the image.
- Width and height: Specify the image size in the chart.
- Retain aspect ratio: Changing the width, the height will be
adjusted in a way that the original aspect ratio of the image will be retained.
The same will happen if the height is changed.
- Original size: The original image size is displayed in pixels.
If desired, the image can be downsized to reduce the required memory space.
- Border: Adjust width, style and color of the border.
Optionally the border can be suppressed.
- Transparent: The transparent color will be retrieved from the
lower left pixel of the image.
The preferences define the properties that will be used for new sheets,
charts and objects.
Preferences can be saved in a template file and loaded later on again. Doing so,
it is possible to provide basic settings for different projects. All numeric
values refer to the currently selected unit (cm or inch).
Sheet
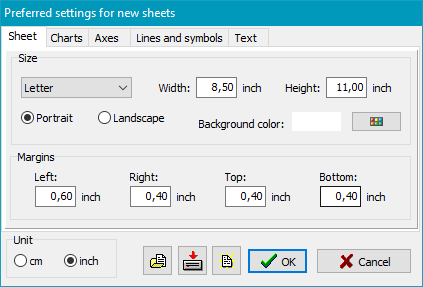
The default values for the sheet size are designed to create a picture to be
inserted in a document (4 x 4 inch2, no margin). The size can be
adjusted to any value or selected from the common paper formats (e.g. ISO A4).
Margins are only required for sheets which should be printed directly.
In addition you can select the background color and the unit of length to be
used (cm or inch).
Charts
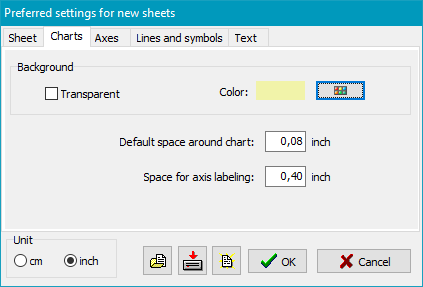
The background of the charts can be transparent (uses the color of the sheet)
or displayed in a selectable color. In addition the border width and the space
for the axis labeling can be adjusted.
Axes
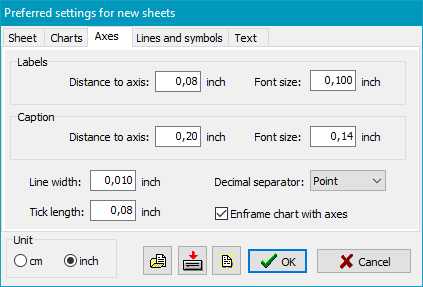
The distance between the axis labels and the axis caption and the particular
font size can be adjusted separately, as well as the line width and the length
of the tick marks. In addition you can select the decimal separator for numeric
values and if the chart should be enframed by axes (left and right, resp. bottom and top).
Lines and symbols
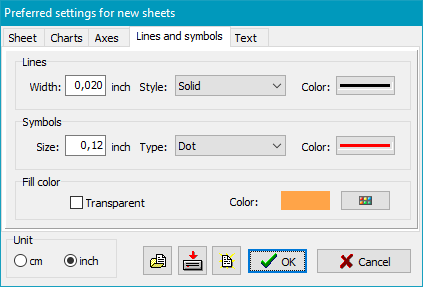
Defines the preferences for curves and functions: Line width and style (e.g.
solid or dotted), line color and the size, color and shape (e.g. circle or square)
of the symbols used for marking the measurement points. The fill color refers
to the graphic object rectangle.
Text
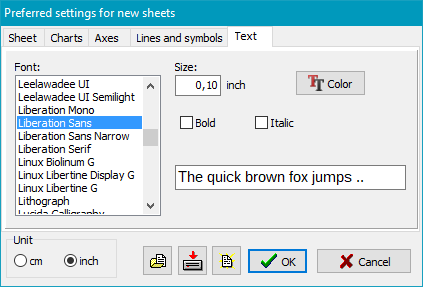
Select the default text font, size, style and color for axis captions and other text.
Individual text formatting
Use the following format characters to enclose particular parts of text which
should be displayed in a special style (e.g. bold or italic), as super- or subscript,
as Greek letters or mathematical symbols:
- *<Text>*: Text enclosed by asterisks will displayed as bold.
- \<Text>\: Text enclosed by back slashes will displayed as italic.
- ^<Text>^: Text enclosed by circumflexes will displayed as superscript.
- _<Text>_: Text enclosed by underlines will displayed as subscript.
- !<Text>!: Text enclosed by exclamation marks will displayed as special characters
(refer to the tables below for the replacement character).
Special characters
Greek letters
| Greek | Character |
| Α | A |
| Β | B |
| Χ | C |
| Δ | D |
| Ε | E |
| Φ | F |
| Γ | G |
| Η | H |
| Ι | I |
| ϑ | J |
| Κ | K |
| Λ | L |
| Μ | M |
|
|
| Greek | Character |
| Ν | M |
| Ο | O |
| Π | P |
| Θ | Q |
| Ρ | R |
| Σ | S |
| Τ | T |
| Υ | U |
| ς | V |
| Ω | W |
| Ξ | X |
| Ψ | Y |
| Ζ | Z |
|
|
| Greek | Character |
| α | a |
| β | b |
| χ | c |
| δ | d |
| ε | e |
| φ | f |
| γ | g |
| η | h |
| ι | i |
| φ | j |
| κ | k |
| λ | l |
| μ | m |
|
|
| Greek | Character |
| ν | m |
| ο | o |
| π | p |
| θ | q |
| ρ | r |
| σ | s |
| τ | t |
| υ | u |
| ϖ | v |
| ω | w |
| ξ | x |
| ψ | y |
| ζ | z |
|
Mathematical symbols
The hex equivalents are shown in parentheses.
| Symbol | Character |
| ≅ | @ | (0040) |
| ≡ | ° | (00B0) |
| ≈ | » | (00BB) |
| ≤ | £ | (00A3) |
| ≥ | ³ | (00B3) |
| ∞ | ¥ | (00A5) |
| × | ´ | (00B4) |
| ⊗ | Ä | (00C4) |
| ⊕ | Å | (00C5) |
| ∏ | Õ | (00D5) |
| ∑ | å | (00E5) |
| √ | Ö | (00D6) |
| ∫ | ò | (00F2) |
| ⟨ | á | (00E1) |
| ⟩ | ñ | (00F1) |
|
|
| Symbol | Character |
| ⊥ | ^ | (005E) |
| ↔ | « | (00AB) |
| → | ® | (00AE) |
| ↓ | ¯ | (00AF) |
| ↵ | ¿ | (00BF) |
| ⇔ | Û | (00DB) |
| ⇐ | Ü | (00DC) |
| ⇑ | Ý | (00DD) |
| ⇒ | Þ | (00DE) |
| ⇓ | ß | (00DF) |
| ◊ | à | (00E0) |
| ♣ | § | (00A7) |
| ♠ | ª | (00AA) |
| ♥ | © | (00A9) |
| ♦ | ¨ | (00A8) |
|
|
| Symbol | Character |
| ℵ | À | (00C0) |
| ℑ | Á | (00C1) |
| ℜ | Â | (00C2) |
| ℘ | Ã | (00C3) |
| ∂ | ¶ | (00B6) |
| ∇ | Ñ | (00D1) |
| ∅ | Æ | (00C6) |
| ∩ | Ç | (00C7) |
| ∪ | È | (00C8() |
| ⊃ | É | (00C9)) |
| ⊇ | Ê | (00CA) |
| ⊄ | Ë | (00CB) |
| ⊂ | Ì | (00CC) |
| ⊆ | Í | (00CD) |
| ∴ | \ | (005C) |
|
Examples:
| y^2^ ⇒ y2 |
x_1_^2^ ⇒ x12 |
x_1_^2^ = y_4_^(a+b)^a^2^ ⇒ x12 = y4(a+b) a2 |
| *bold* text ⇒ bold text |
\italic\ text ⇒ italic text |
!abcd! ⇒ αβχδ |
!å@³! ⇒ ∑≅ℜ≥ |
Entry of special characters
To enter characters not available on the keyboard, you can open a dialog
(see the picture at the right) to select the desired character with a mouse
click from a table or by entering the associated hex code in the field at
the lower left.
If starting the program via a desktop shortcut or from another program, it
is possible to control its behavior by the following option:
- none
- The program starts showing the last opened sheet.
-
- [Sheet]
- The specified Sheet will be loaded and displayed..
-
- /ini:[IniFile]
- All program settings made by the user (such as the preferences for new sheets)
are saved in the file RPlot.ini. By default, you will find this file
in the directory used for the Application data of the user:
- Vista, Windows 7,8 and 10: C:\users\<username>\AppData\Roaming
- Windows 2000 and XP: C:\Documents and Settings\<username>\Application Data\
Using this option you can select an alternative configuration file in the default
directory (e.g. /ini:pb.ini ) or at any other location. For this, a full path
must be specified.
-
Keyboard shortcuts
Dr. J. Rathlev, 24222 Schwentinental, Germany, April 2020