|
|
Personal Backup Version 5.9 |
| © 2001 − 2018, Dr. J. Rathlev |
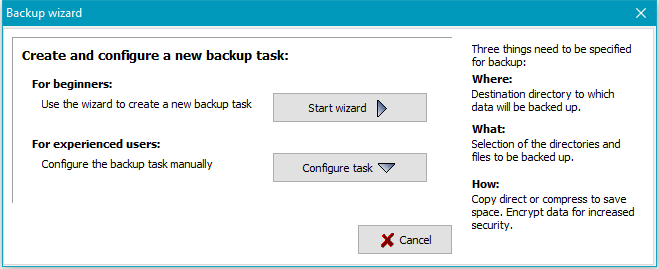
A wizard can help the less-experienced user create a backup task. The wizard
will lead you through the basic settings (Start wizard button). A task created in this
way can later be edited using the program desktop functions described below.
The experienced user can skip this wizard by clicking the Configure task
button and entering the settings directly.
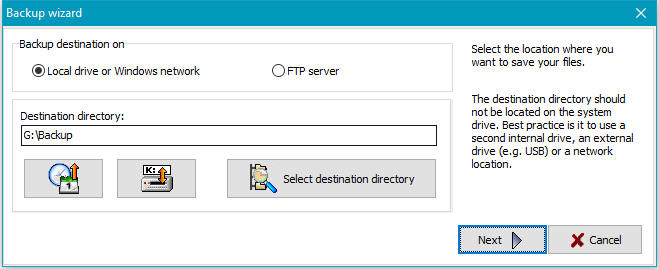
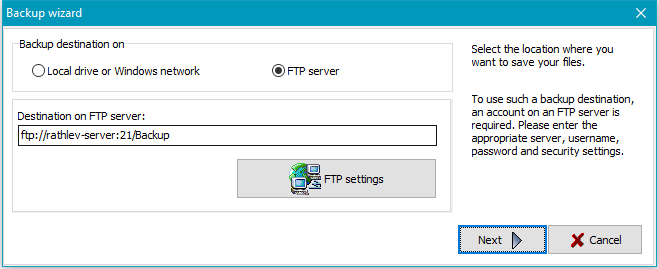
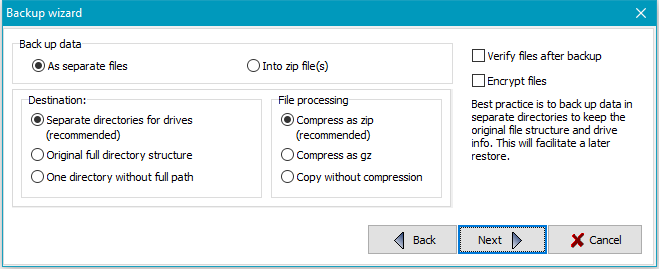
You have the following choices for the backup destination: on a local drive or Windows network or on an FTP server:
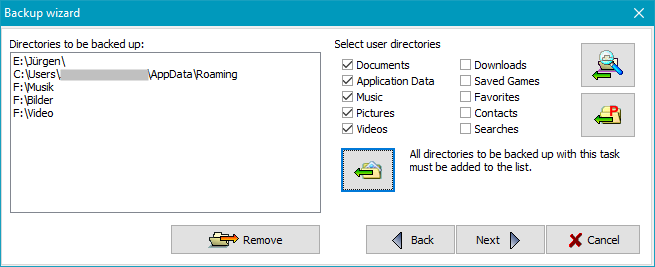
Next, select the directories you wish to back up:
![]() All basic user directories (Documents, Application Data,
Music, etc.) are already preselected and can be added to the list simply by
clicking the button.
All basic user directories (Documents, Application Data,
Music, etc.) are already preselected and can be added to the list simply by
clicking the button.
![]() Some applications (for example Starmoney) save their data in the directory
Program Data. By clicking the button, the desired subdirectory can be
selected and added to the list.
Some applications (for example Starmoney) save their data in the directory
Program Data. By clicking the button, the desired subdirectory can be
selected and added to the list.
![]() By clicking this button, any other directory can be selected for backup.
By clicking this button, any other directory can be selected for backup.
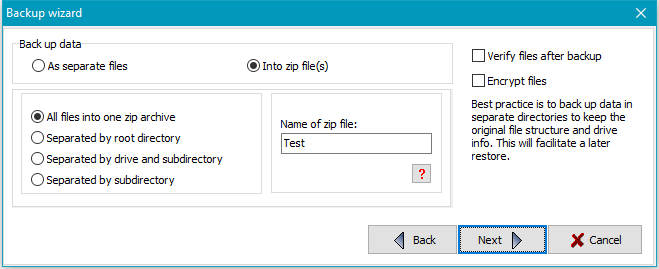
Then select how the files are to be stored in
the destination directory: as single files using a directory structure
true to original or as zip archives. On backing up to single files the user
can select if files should be copied with or without
compression.
In addition you can specify if the files should be
verified and/or
encrypted during backup.
Finally, you can specify whether you want to start the new backup automatically
under a selection of conditions (more ..).
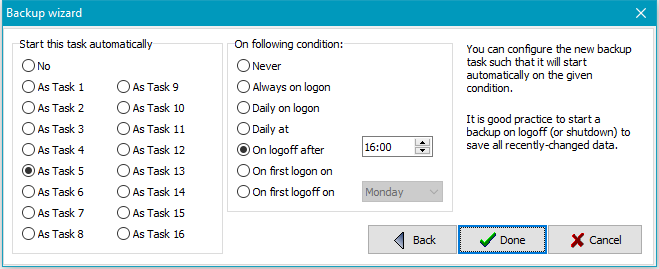
Click the Done button to store and complete the new task. The wizard
will be closed. To start the new backup, just click the
Start button.
The destination path is displayed towards the top of the program center window. It can be a local
path, a network path or a directory on an FTP server.

Click on the button on the right of the entry field to select a directory
anywhere on your computer or on your network or edit the path manually.
Clicking the down arrow at the right of the entry field will drop down a list
of recently-used destination directories for quick selection. Right-clicking
this field will open a menu for editing this list.
It is also possible to insert placeholders for date and time into the path
and to replace the drive letter with the volume name of a removable drive
(e.g. a USB stick).
If you need a special account to access the destination directory, click the
button and enter the username. If also a password is specified, this will be encrypted
and saved in the task file. The connection to the backup directory will be made
automatically. If no password is specified, the user will be prompted to enter
the password for each backup.
When using USB sticks or external drives as backup destination, the system may
not always assign the same drive letter.
To be independent from drive letters when backing up data, you can use
the volume specifier of the removable media (:<volumename>:) instead.
Example: instead of K:\Backup use :Backup-1:\Backup
On backing up, the program will check whether a medium with the specified volume name (regardless
of the assigned drive letter) is connected. If not, the user will be prompted
to insert it.
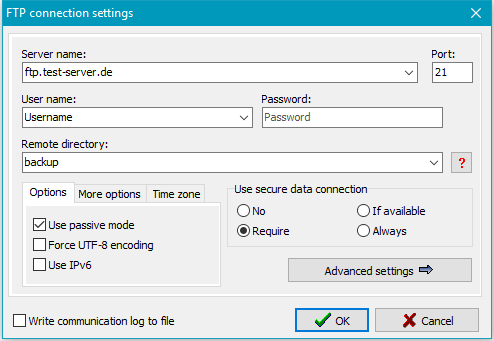
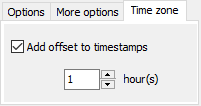
If you select a destination on an FTP server, the server's name, port and the remote directory are displayed. Click the button at right to specify or edit the required connection settings.

General settings:
 |
 |
 |
The destination directory may contain one or more placeholders for date and time.
If a password is specified in the dialog, the connection to the FTP server will
be established automatically. If you leave the password blank for greater security,
you must insert it manually before each backup.
Clicking the Advanced settings button will open the following page.
Advanced settings: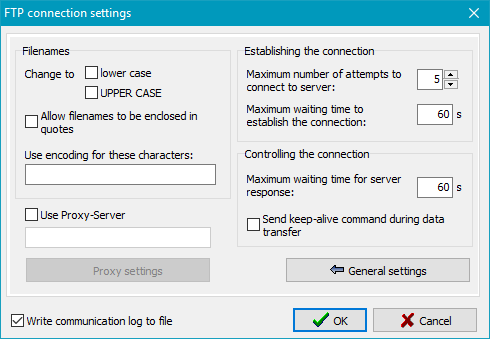
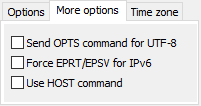
You can find more information about FTP on Wikipedia.
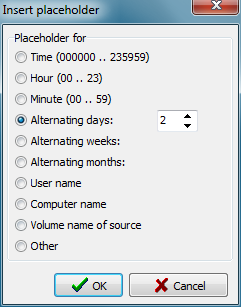
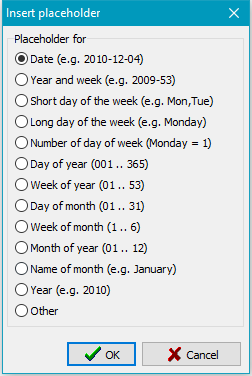
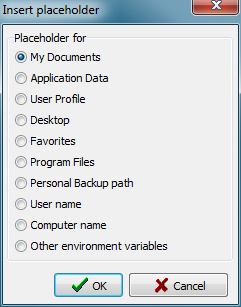
Clicking the button causes the dialog box (reproduced on the right) to appear, in which a placeholder in the format "%sss%" is added to the directory name, with "%sss%" being replaced with current values on backing up:
Placeholder for Windows environment variables: In addition you can use any Windows environment variable as part of the destination path. Insert the placholder %evar(<name>)% manually. The expression inside the brackets (<name>) should be replaced by the name of the environment variable, e.g. %evar(HOMEPATH)% or %evar(TEMP)%.
Example: X:\Backup\Data-%date% ⇒ X:\Backup\Data-2004-10-17
Hence another backup directory will be generated each day.
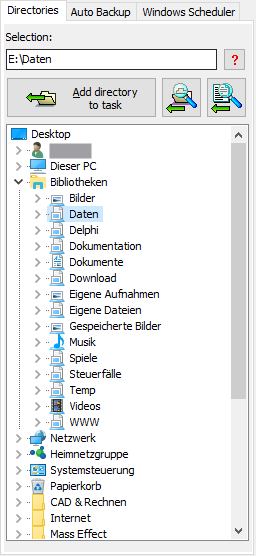
Next, select the directories to be backed-up. Click on the Directories
tab and select the desired directories you wish to back up. If you select only one directory, it
will be displayed in the upper field and can be added directly to the task by
clicking the button.
If you select more than one directory (possibly from libraries),
after clicking the button these will be displayed as a list prior to being added
to the task. You can check and optionally deselect individual directories.
A click on the OK button will add the directories to the task one after the other.
![]() If you wish to inspect the files contained in the selected directory, click this button.
The dialog box option Show files allows you to display a file list, but you can select
only one directory.
If you wish to inspect the files contained in the selected directory, click this button.
The dialog box option Show files allows you to display a file list, but you can select
only one directory.
 From version 5.8.5, you can directly select one or more files from a directory
for backup. Although this was possible with earlier versions, some manual
adjustment of the required filters was necessary. The current version will
perform this automatically. Clicking the button will open a dialog to select
one or more files to be backed up. The directory containing these files will be
added to the backup task, all subdirectories will be excluded from backup and the required
file filters such that only the selected files will be backed up.
From version 5.8.5, you can directly select one or more files from a directory
for backup. Although this was possible with earlier versions, some manual
adjustment of the required filters was necessary. The current version will
perform this automatically. Clicking the button will open a dialog to select
one or more files to be backed up. The directory containing these files will be
added to the backup task, all subdirectories will be excluded from backup and the required
file filters such that only the selected files will be backed up.
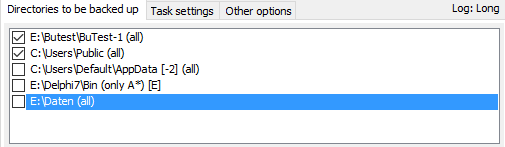
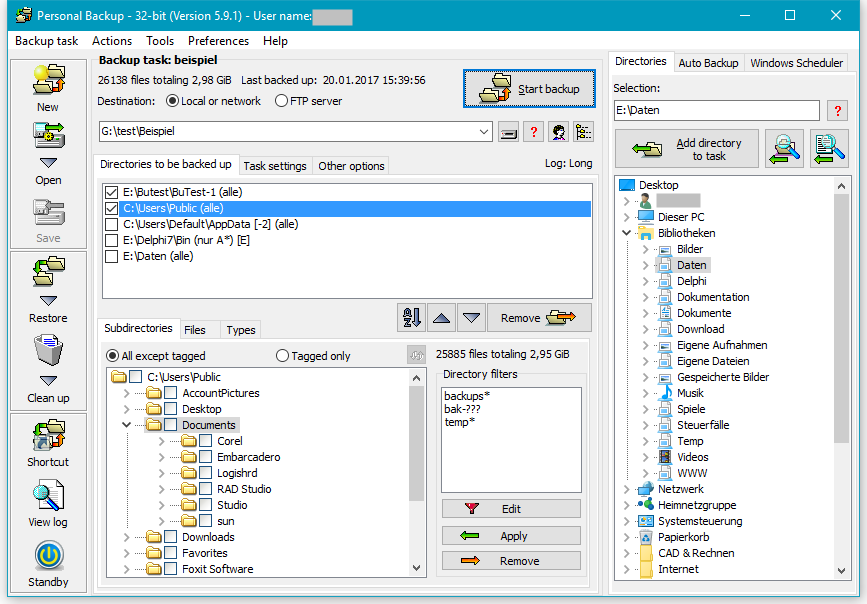
The names of all selected directories will be added to the task list in the center.
Long names will appear abbreviated in the task directory list such that the beginning
and end of the path will remain visible. Moving the mouse over a such a name will
display the full path as a tooltip.
The checkbox ![]() on the left can be cleared by clicking to exclude the selected directory
from backup temporarily without removing it from the list. If you wish
to resume the backup for this directory just click the checkbox again.
on the left can be cleared by clicking to exclude the selected directory
from backup temporarily without removing it from the list. If you wish
to resume the backup for this directory just click the checkbox again.
After each directory name, additional info is displayed in an abbreviated form to
indicate the subdirectories selected and any filter
settings for file and file types:
Clicking one of the listed directories will display the tree of all subdirectories or, dependent on the user's selection, the file filters or file types in the program bottom window (see more). Doing this click for the first time after opening the task, will additionally scan all these subdirectories for new and changed files and update the display for file count and volume.
Disabled entries
On loading a task or clicking one of the listed items, the program will check
wether the associated directory still exists. For example, it could have been deleted or
renamed in the meantime, or is a disconnected external drive. Such a
directory will be disabled in the list and displayed in gray.
To prevent the selection settings
from being changed, it is no longer clickable. As soon as the
directory becomes available again, the item will be reenabled automatically.
If you want to remove from the task all directories no longer available, use
the item from the associated
context menu.
![]() Clicking the left button will rearrange the directories to be backed up into an
alphabetical order. Clicking one of the other buttons will move the selected entry
one row up or down.
Clicking the left button will rearrange the directories to be backed up into an
alphabetical order. Clicking one of the other buttons will move the selected entry
one row up or down.
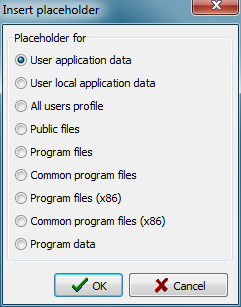
![]() Clicking the button
at the top on the right will open a dialog box. All placeholders are in the format
"%sss%". These will be replaced with current values on backing up
(see screenshot on the right):
Clicking the button
at the top on the right will open a dialog box. All placeholders are in the format
"%sss%". These will be replaced with current values on backing up
(see screenshot on the right):
| Other environment variables: | Windows Vista/7/8/10 | Windows XP | |
| C:\Users\<username>\AppData\Roaming | C:\Documents and Settings\<username>\Application Data | ||
| C:\Users\<username>\AppData\Local | not available | ||
| C:\ProgramData | C:\Documents and Settings\All Users | ||
| C:\Users\Public | not available | ||
| C:\Program Files | C:\Program Files | ||
| C:\Program Files\Common Files | C:\Program Files\Common Files | ||
| C:\Program Files (x86) | C:\Program Files | ||
| C:\Program Files (x86)\Common Files | C:\Program Files\Common Files | ||
| C:\ProgramData | not available |
* only available on 64-bit systems
If you want to back up files from a removable drive (e.g. a USB stick) you cannot be certain that the same drive letter will always be assigned. In such a case, using file synchronization on backup may result in loss of data in the backup directory.
To prevent this, the program saves the volume name (if assigned) with any directory
to be saved and located on a removable drive when creating a new task.
So it is strongly recommended
to assign a unique volume name to any used removable drive. Right-clicking on a drive
in for example Windows Explorer and selecting Properties will allow you to do so.
Before a backup starts, the program checks whether this drive is present.
If not, the backup will be canceled.
Note: If the backup method is set to Separate directories for drives,
the name of the root directory at the destination will be generated from the
volume name (e.g. G:\Backup\Daten-1\..) instead of using the drive letter
(e.g. G:\Backup\DrvK\..) as applied for fixed drives
(see more).
To remove a directory from the task list, click on the
![]() button. Optionally, also all files backed up from this directory can at the
same time be deleted from the backup task destination.
button. Optionally, also all files backed up from this directory can at the
same time be deleted from the backup task destination.
Right-clicking the list of selected directories will open a context menu with several preview options
In the program bottom window you can make more detailed selections for
In most cases you can use the default settings for a backup, but the more experienced user may prefer to configure the many individual options.
At the top of the program center window, key information about the current task is displayed:
There can be many different reasons for errors that arise during a backup. After each backup, the status windows will display whether errors occured and how many. Detailed information about errors will be found in the log file. If a file could not be copied due to an error, its previous version will in any case be retained at the destination.
To accelerate the loading of a task, the number of files, the required storage capacity and the type list for the selected directories are not all updated immediately. By default, only the first directory will always be scanned for new files. You can uncheck the option Scan directories in the dialog called from Preferences ⇒ Program start ... in the main menu to disable any scan after opening a task. In this case, a scan is started not before one of the directories to be backed up is left-clicked.